The Tenebrous Sea prologue houses one boss: the Nether Kraken. It is the game's first real combat encounter — three readable attacks across a wooden ship deck, on a body that punishes panic-dashing but rewards reading the three deck-grate tells. The fight runs roughly 3-4 minutes of clip time and most blind first-attempts clear it in 1-2 tries because the design intent is to teach the dash mechanic, not to gate progress.
FACT-CHECK ANCHOR
Region placement and boss roster fact-checked against the Scout addendum (docs/research/scout-opportunity.md). Attack patterns, telegraph reads, and counters authored from frame-by-frame review of the source clip (Kakuchopurei ALL BOSS FIGHTS compilation); each attack's source_url anchors to the timestamp at which it first appears. Watermarks are baked into each .webp at capture.
Nether Kraken — Shipwreck Deck
Nether Kraken
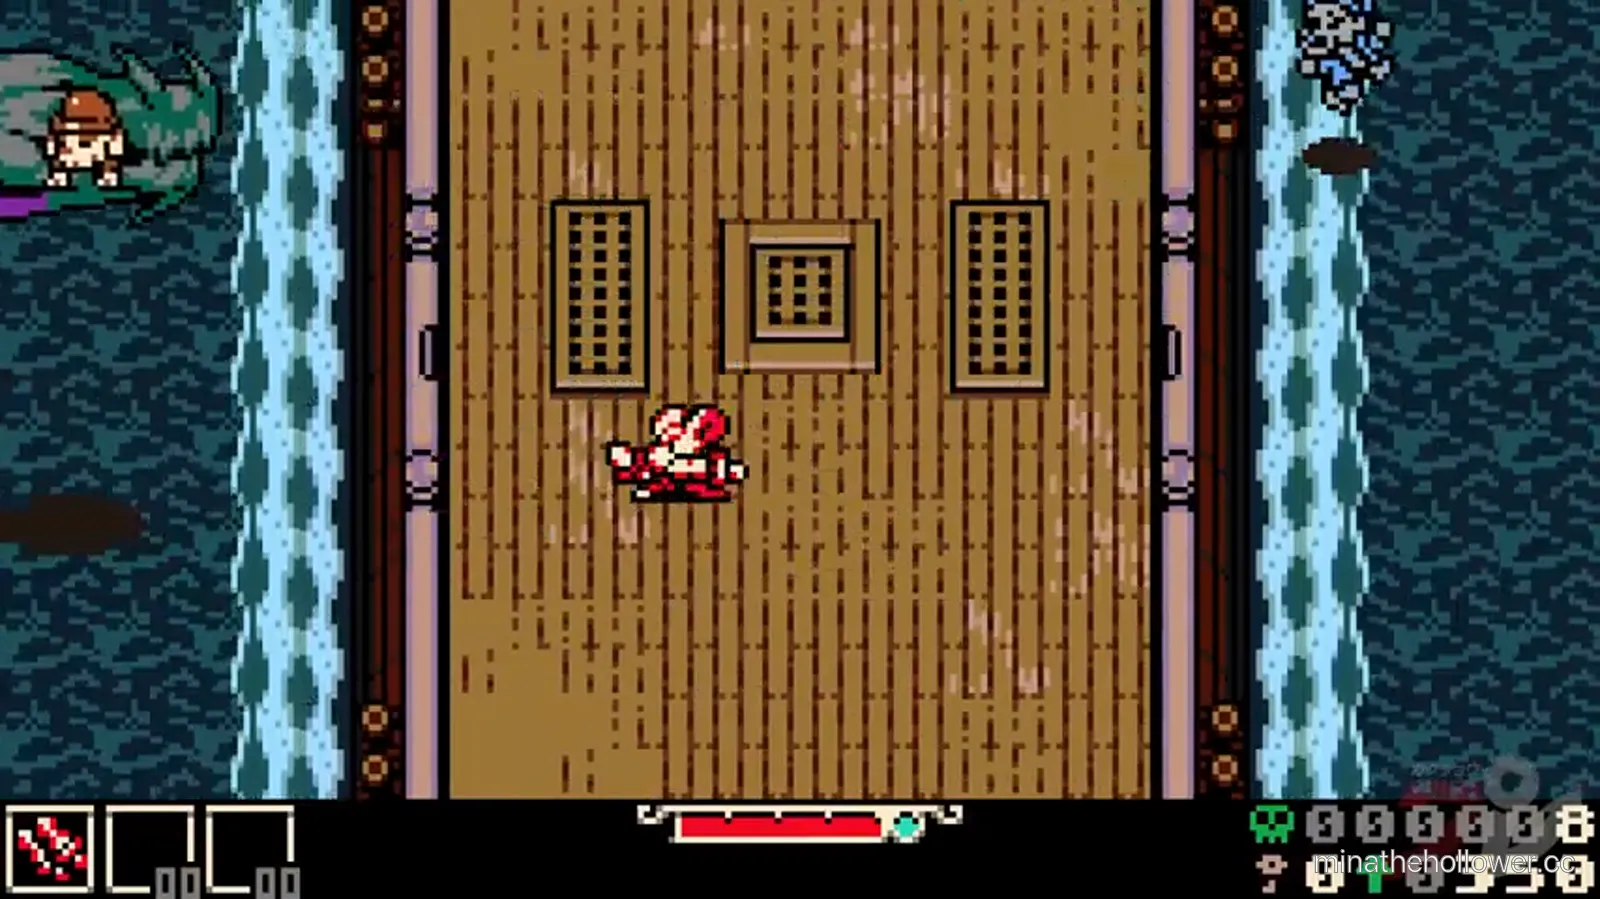
Frame from Kakuchopurei · clip @ 0:38
The arena, on first read
The ship deck has three deck grates arranged in a row across the centre of the floor. Each grate is a fixed origin for the kraken's main tentacle slam — the boss rotates the active grate across the fight rather than firing all three at once. The kraken's body itself surfaces on the side of the ship (visible at the top edge of the arena) and the central purple eye is the kill target. The body above the water line is invulnerable — only the eye registers weapon hits, and the eye is only exposed during the volley wind-up.
Three things matter on first attempt:
- Identify the active grate. One grate's cover briefly cracks or glows before the slam — a half-beat warning. That's the lane to leave.
- Mind the centre planks. The middle three columns of planks are safe from the side-tentacle sweeps. The outer strips of the deck (port and starboard) are the side tentacles' territory.
- The central eye is the only target. Don't waste weapon swings on the body sprite at the top of the arena. Wait for the eye-volley wind-up to expose the eye, then commit hits.
Attack 1 — Tentacle slam (frame-by-frame)
The slam is the kraken's signature attack and the one the fight is built around. The wind-up runs roughly three beats: a grate-cover crack (half a beat of warning) → tentacle emerges through the grate (one beat of travel) → tentacle peaks (one beat of held threat) → slam down (active frame). The hitbox is the grate tile itself plus a single tile of overlap to either side; nothing further. Recovery is slow — the tentacle stays visible on the deck for a full beat before retracting, but the active frame is only the moment of impact.
Misread that kills you here: dashing across the active grate during the rising tentacle phase. The travel is slow enough that it looks safe to cross, but the slam fires before you clear the tile. Always pre-commit to a non-grate tile before the tentacle peaks.
Attack 2 — Eye volley (the punish window)
The eye-volley is your damage window. The kraken's body bobs upward at the top of the arena and the central eye opens to fire a 3-projectile spread in fixed lanes. The wind-up is the slowest in the rotation — roughly two full beats of held tell before the projectiles fire — which is why this is the lane to commit damage on.
The three projectile lanes are evenly spaced across the deck width. Strafe diagonally between two lanes during the wind-up, then dash forward and land a single weapon hit on the exposed eye during recovery before the eye closes again. Greedy 2-hit punishes get caught by the side-tentacle bracket that often follows.
Attack 3 — Side-tentacle bracket
The bracket is the rotation's filler — two thinner tentacles sweep from the port and starboard edges across the outer strips of the deck. The hitbox covers the outer one-and-a-half tiles of each side; the centre three columns are safe through the entire animation.
The bracket fires fast (no real wind-up) but its damage radius is narrow, so the punish is positional, not reactive: stay centred from the start of the volley recovery and the bracket never threatens you.
The clean rotation in one sentence
Tentacle slam → step off the marked grate → eye-volley → strafe between 3-projectile lanes → land 1 weapon hit on the eye during recovery → side-tentacle bracket → return to centre planks → repeat.
Common deaths and why they happen
- Eating the side-tentacle bracket from the wrong starboard column. Players who dash toward the right side to clear the active grate forget the bracket fires immediately after, and they don't have time to dash back to centre. Fix: clear the grate toward the unused grate position, not toward the side.
- Missing the eye because you committed too early. The eye registers hits only after the volley fires — players who swing during the wind-up don't connect. Fix: wait for the projectiles to leave the eye, then dash in.
- Drowning in the slam recovery. The tentacle's slam tile stays visible after impact, but the damage frame is only the moment of contact. Players assume the entire visible tentacle is dangerous and dance unnecessarily. Fix: read the tentacle peak frame, not the tentacle sprite.
Tier justification — why Nether Kraken is C-tier
The kraken sits at the bottom of the tier chart for three reasons. First, every attack has a multi-beat telegraph: the grate crack precedes the slam, the eye opens before the volley, and the bracket fires on a predictable cadence after the volley. Second, the arena is small enough that no attack requires arena-wide movement — every dodge is one or two dashes. Third, the fight teaches a mechanic (the dash budget) rather than testing one, so the design tolerance for misreads is wide. Most players clear in one attempt.
Pro tips
- Pre-commit dashes — read the tentacle peak rather than the tentacle rise. The peak is the lock-in frame; you have a full beat to position after.
- Two-grate dodges — when the active grate is on either side, the middle and far grate are both safe lanes. Bias toward the centre grate for faster eye-volley repositioning.
- Wait the volley out, don't cancel it. Some players try to dash through the projectile lanes during fire; the lanes are narrow and the shots land before you clear. Stand between two lanes, take the volley as a free wind-down window.
- Don't dig. The dig prompt is taught in the pre-boss corridor; the deck floor doesn't have dig tiles. Players who reflex-dig during the fight lose their dash budget.
Speedrun notes
The fastest clears land the eye damage exclusively during the volley recovery — never on the slam-following frames. A clean 4-cycle kill is achievable in roughly 2:30 of fight time. The slam and bracket damage are skippable; both are positioning attacks rather than DPS checks.
Lore notes
The Nether Kraken is the storm-summoned beast that wrecks Mina's shipwreck in the cold-open cinematic. The framing is environmental: the ship's lanterns are extinguished as the storm rolls in, the crew silhouettes disappear from the deck rails, and the kraken's tentacles hammer the central deck before the boss bar appears. The Cappy NPC's post-prologue dialogue ("I'm gonna keep scroungin' for supplies… maybe I'll see you in Ossex") frames the kraken's defeat as Mina's first victory under hard odds — the design intent is to tutorialise the dash budget on a fight you cannot lose, not to test combat skill.
The kraken does not return later in the campaign. The shipwreck deck itself is not re-explorable after the post-boss death-fade — the prologue is a one-way corridor.
Frequently asked
Is the Nether Kraken missable? No. It is a hard-coded story gate at the end of the prologue corridor. You cannot leave the Tenebrous Sea without clearing it.
Best weapon for the fight? You only have the starting Nightstar at this point; weapon swap unlocks later in Ossex. Use the Nightstar's default attack; the swing range is wide enough to land the eye hits.
Can the kraken kill you in one combo? No, with full HP. The slam is roughly a third of Mina's base HP bar per hit; the volley projectiles are roughly a sixth each. A clean run takes 1-2 hits maximum.
Does the fight reward anything beyond progress? No. The kraken does not drop a trinket or trophy. The reward is the path to Loner's Landing
- the survivor-NPC introduction.
Why is the body invulnerable? Game-design teaching beat: the central eye is the only valid target. Players who swing at the body learn that weapon hits don't register, which teaches the principle that boss kill targets often differ from the boss sprite.
What to do after this fight
- Head to Ossex bosses for the central hub's Hulk Trooper + Maxi + Thorne composite.
- Full traversal: Prologue walkthrough covers the upper-deck corridor, the dig prompt, and the post-boss arrival at Loner's Landing.
- First Generator region: Queensbury Crypt — the Duchess is the next major boss after the prologue is cleared and Ossex unlocks.
- For the full difficulty arc: All bosses hub shows the tier-by-tier roster.
PATCH MAINTENANCE Tactics here verified against patch 1.0.0 on 2026-05-31. If a future patch shifts the tentacle slam telegraph timing or the eye-volley lane spacing we update this page within 24-72 hours and bump the patch line in the footer.