SPOILER · FINAL REGION This page covers the campaign's final boss chain. Lionel is the actual fight that closes the campaign; read it only when you're ready for the late-game reveal. The Cappy NPC epilogue + the post-credits world-tour sequence are documented on All endings explained; this page deliberately stops at the Lionel phase 3 kill.
The final region houses three boss fights including Lionel, the final boss treated as a single multi-phase composite per the Scout addendum IA decision (same shape as Thorne — a multi-encounter boss handled on one page so 'how to beat lionel' SEO intent doesn't fragment across three URLs).
The fights in order: Orrery Warden (regional mid-boss, soul-wave add-clear) → The Congealed (mirror-world mid-boss, multi-limb demon-form) → Lionel (the three-phase campaign final). The sequence runs roughly 18-25 minutes of fight time end-to-end across the three encounters, with the Lionel chain alone accounting for 12-18 of those minutes.
Orrery Warden — cosmic-atrium soul-wave summoner
Orrery Warden
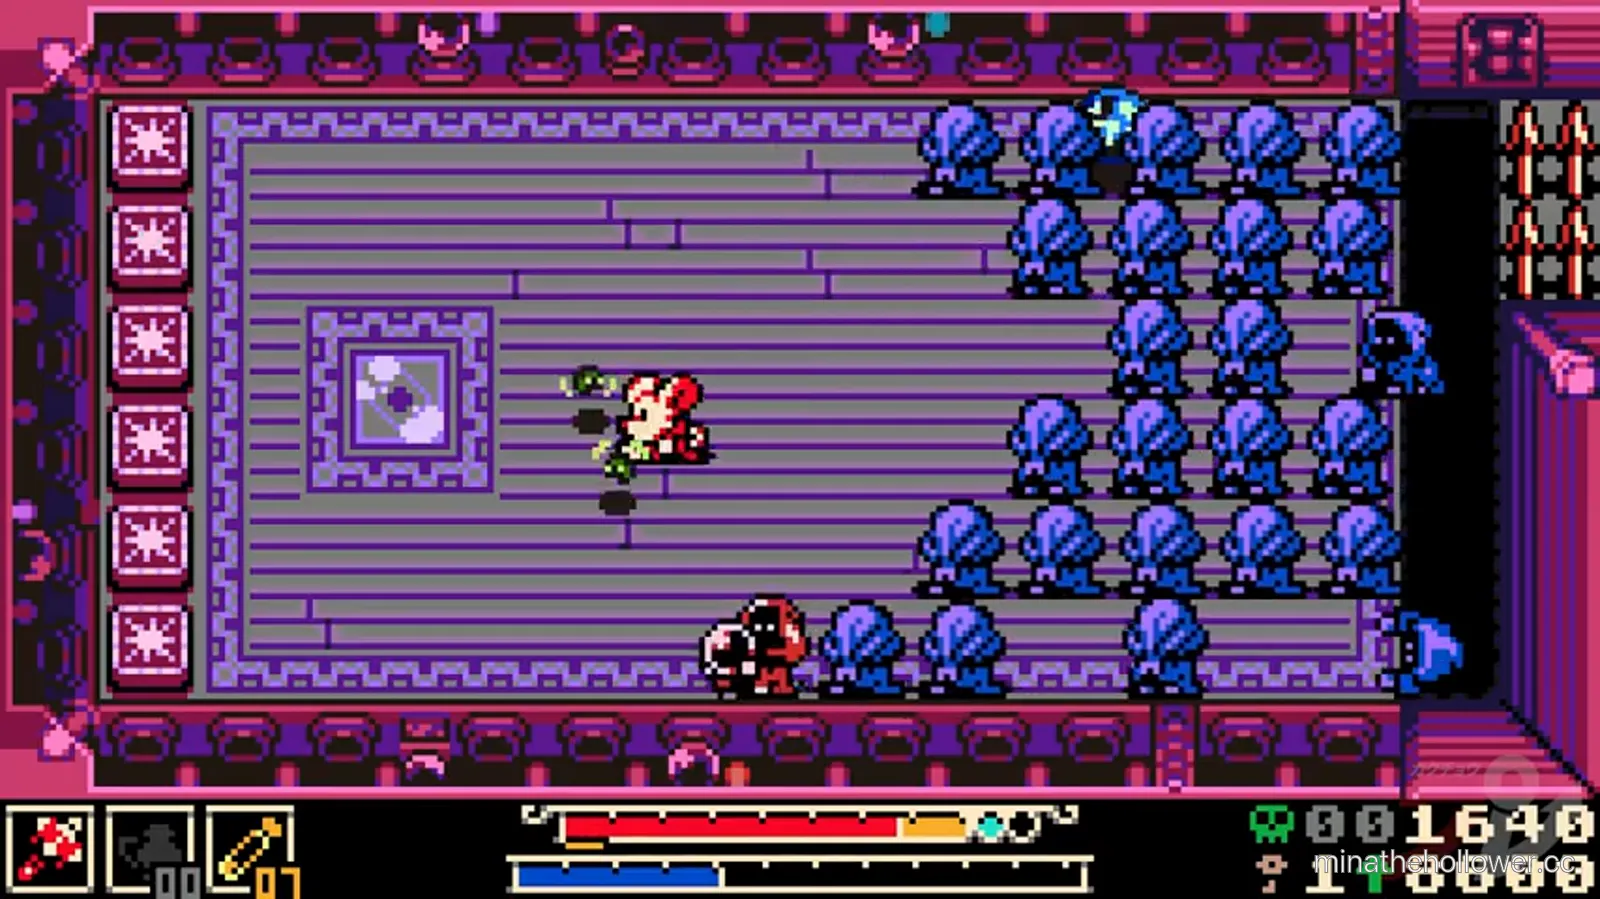
Frame from Kakuchopurei · clip @ 50:32
The arena, on first read
A pink/purple cosmic atrium with a glowing pink crystal-door on the left wall and continuous waves of blue ghost-soul minions spawning from the right. Red spike strips along both horizontal walls bracket the effective combat zone to the middle two-thirds vertically.
The fight is a sustained add-clear rather than a one-tell read. There is no single "the move" — the entire fight is a positioning puzzle around continuous soul spawns, a single ranged crystal-bolt tell, and the spike-strip floor borders.
Attack 1 — Soul wave spawn (the continuous tell)
The spawn is continuous from t=0 of the fight — souls fade in along the right wall in waves of 2-3, then home in on the player. Sweep horizontally through the column with weapon swings. The souls die in a single weapon hit but their hitboxes are tighter than the player's swing arc, so committing to a sustained horizontal sweep clears more souls per swing than reactive vertical dodges do.
This is not a one-shot attack — it's the fight's baseline rhythm. Players who treat the souls as background noise die to chip damage; players who treat the souls as the fight's primary objective clear in 3-4 minutes.
Attack 2 — Crystal-door bolt
The single ranged tell. The crystal door on the left wall flickers pink for half a beat before firing a single bolt across the arena in a fixed row. Sidestep into a different row before the crystal flicker peaks.
The bolt fires every 4-6 wave cycles. It's the only attack in the fight that demands a vertical dodge; everything else is horizontal sweep clearance.
Attack 3 — Spike-strip border (always-on)
The strips along the top and bottom walls aren't attacks — they're arena boundaries. The effective combat zone is roughly the middle two-thirds vertically. Maintain a one-tile buffer from both walls.
Common deaths
- Soul-wave chip stack. Players who try to focus damage on the Warden body (the kill target) while ignoring the souls die to the cumulative chip damage. Fix: clear the souls every wave; Warden damage comes from punish windows between sweeps.
- Spike-strip back-dash. Reactive dodges away from a soul cluster plant Mina in the strip. Fix: dodge along the horizontal axis, never north/south past the middle two-thirds.
Tier justification — why Orrery Warden is B-tier
Orrery Warden lands B-tier because the sustained add-clear is a mechanical test (positioning + sweep cadence) but the boss attacks themselves are easy to read. Players who treat the soul spawns as the primary objective clear in 2-3 attempts.
The Congealed — multi-limbed demon-form
The Congealed
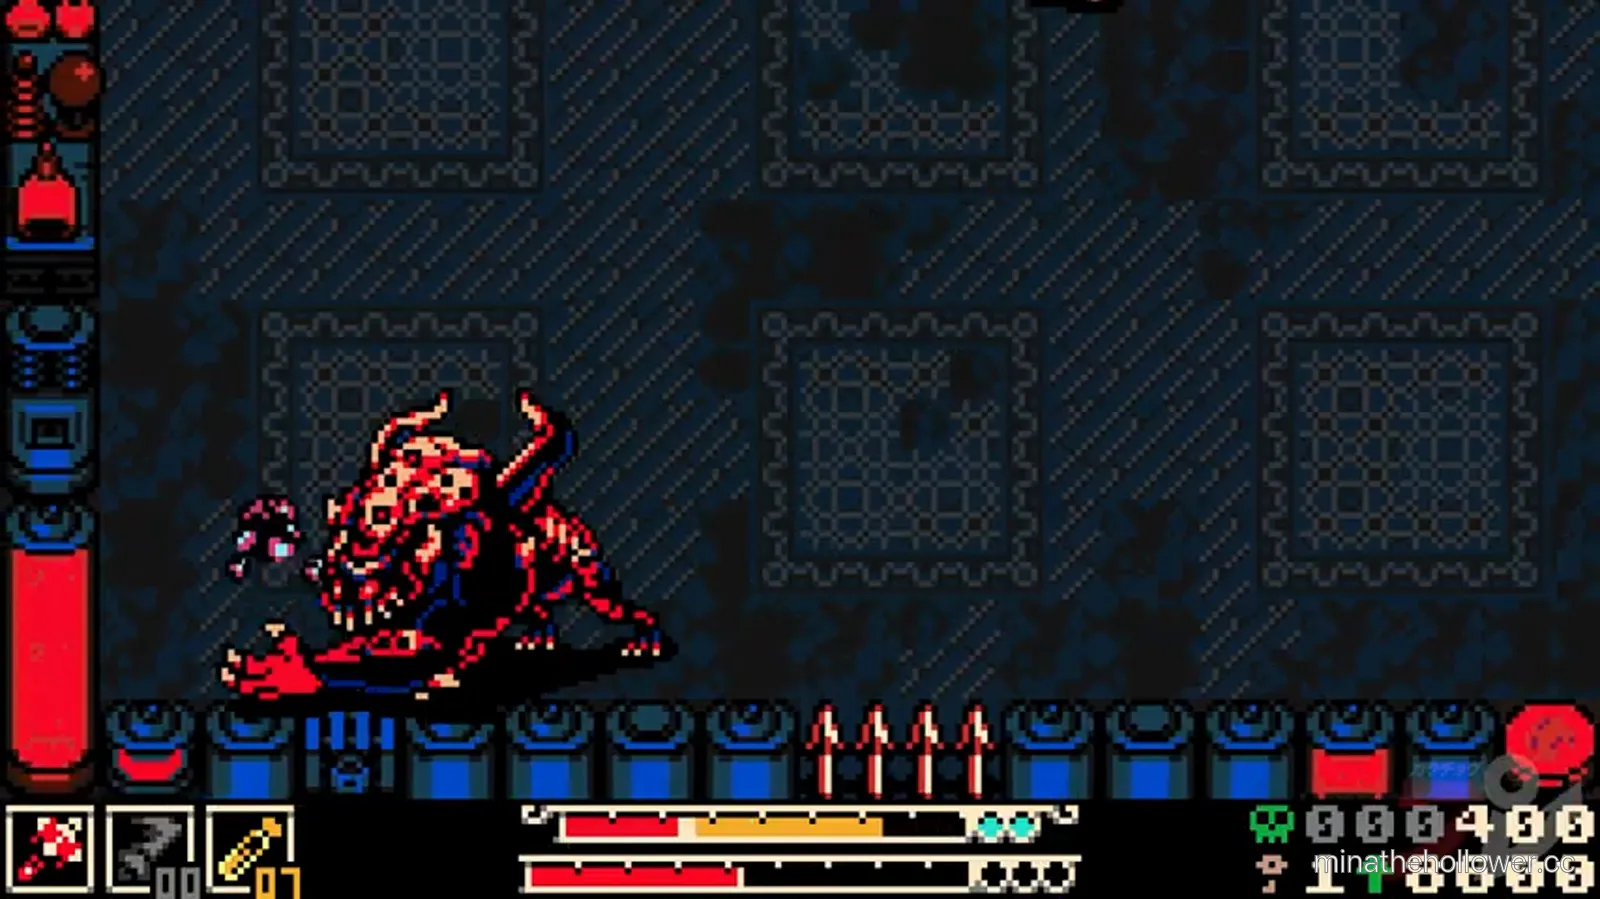
Frame from Kakuchopurei · clip @ 52:59
The Congealed is one of the longest encounter windows on the main path. The boss is a massive multi-limbed demon-form in red and black; the body itself is the kill target.
The counter-intuitive read
Dash toward the body, not away. The limb sweep's hitbox is along the arc; the inner space close to the boss body is safe during the sweep. The slow limb recovery is the cleanest punish window in the entire fight.
This is the fight's signature mechanic. Players who instinctively back away from a giant boss sprite end up in the limb arc's outer range; players who push in toward the body sit in the safe inner zone.
Attack 1 — Multi-limb sweep
Multiple limbs extend from the body and sweep outward in a wide arc. The arc covers the entire outer-half of the arena horizontally, but the inner one-third (close to the body) is safe through the entire sweep.
Attack 2 — Body-slam charge
The highest-damage attack in the fight. The body itself charges along the player's horizontal line — a missed read here often ends the encounter. Dash perpendicular to the slam line; the body itself is the hitbox so there's no slim limb to dodge past.
The slam is the cleanest "single big tell" in the rotation: the boss's sprite gathers momentum visibly, then commits to the charge with a full beat of warning.
Attack 3 — Pressure crawl
Between sweeps the boss crawls slowly across the arena, repositioning the limb-sweep origin. The crawl itself is not damaging but it narrows the safe inner zone over time. Bait the next sweep before the crawl closes the inner zone past dash range.
Attack 4 — Spike-floor hazard
The arena floor has spike-bracket patches that activate during the pressure crawl. Map the patches on the first sweep; they don't move but they do extend the boss's effective threat zone.
Common deaths
- Backing away from the body. Instinctive but wrong. The outer arc is the danger zone. Fix: dash inward during the sweep tell.
- Tanking the body slam. Players who try to trade hits during the charge eat full damage from the body-itself hitbox. Fix: the slam is dodge-only; punish on the recovery.
- Spike-bracket suicide. Backing into a floor patch during the pressure crawl. Fix: map the patches on the first sweep.
Tier justification — why The Congealed is A-tier
A-tier because the counter-intuitive "dash toward" rule is a hard read for players who have spent the campaign learning to dodge away from boss sprites. Players who internalise the rule clear in 2-3 attempts; players who fight against the instinct can stall at 5+ attempts.
Lionel — final boss (S-tier, 3 phases)
Lionel
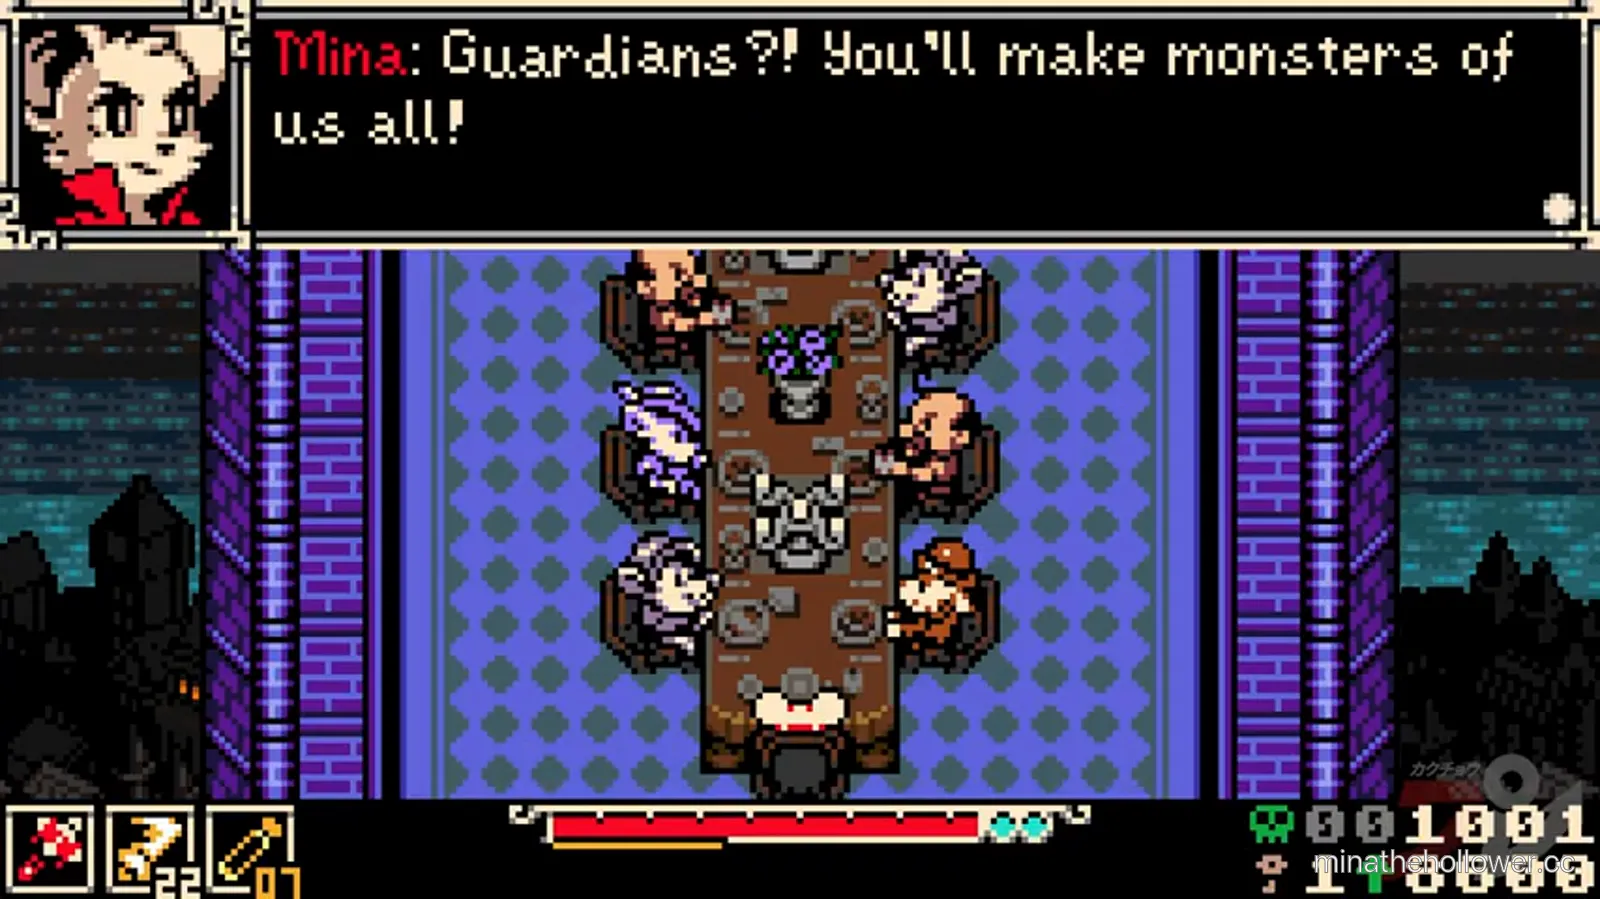
Frame from Kakuchopurei · clip @ 63:36
Switch the PHASE 1 / PHASE 2 / PHASE 3 tabs above to view each phase. Lionel is one boss across three encounters — treated as a single composite per the same IA decision as Thorne.
Phase 1 — Radiant Manor (story + approach, t≈1:03:00–1:08:30)
Phase 1 is primarily a series of dialogue beats in the Radiant Manor dining room. Mina's line ('Guardians?! You'll make monsters of us all!') and Lionel's reply ('You couldn't simply leave that poor woman alone in her chair, could you? You became her wor...') frame the final-fight motivation. Combat does not begin until the approach corridor; servant minions on the corridor walls fall in one hit.
The phase has minimal combat reading — it's a story gate. The dialogue itself sets the late-game framing that pays off in the post-Lionel ending cinematic (see final choice deep dive).
Phase 2 — Conveyor Lord (t≈1:09:00–1:13:00)
Lionel's transformed form is a white-haired blue-armored fencer on a conveyor-belt arena. The conveyor floor segments alter Mina's effective dodge distance — dodging in the direction of belt travel is faster, against the belt is slower. The belt direction shifts periodically; identify the current direction from the floor texture pattern.
Two combat reads:
- Conveyor-floor charge — Lionel charges along the belt's direction of travel; dash with the belt for the fastest exit. Dashing against the belt during a charge often catches Mina before the dash completes.
- Sword slash combo — a two-hit linked combo. Dash past the first slash to break line of sight, then dash again to clear the second. Greed past the dodge sequence catches the second swing.
The red spike strips along the top wall are the positional trap. Maintain a two-tile buffer from the top wall throughout.
Phase 3 — Giant Final Form (t≈1:14:00–1:19:51)
The giant purple-hair final form occupies roughly one-third of the visible screen, with Mina rendered tiny at the bottom for dramatic scale. The phase has three sustained-pattern reads:
- Giant-form fist strike — shadow indicator on the floor marks the landing zone a full beat before impact. Cleanest read in the fight; the wide telegraph + clear landing zone make this the primary safe-window opportunity.
- Wolf-beast summon — purple wolf minion echoes Thorne r3's wolf-form; kite the wolf into a fist-strike shadow for free clearance.
- Green-star projectile spread — slow-arc fan from the giant form's chest. Find a gap between two trajectories; the speed is forgiving.
This is the final encounter of the main campaign. The post-Lionel cinematic feeds directly into the final-choice selection sequence — documented on final choice deep dive.
Common deaths (Lionel composite)
- Phase 2 belt mis-direction. Dodging against the belt during the conveyor-floor charge. Fix: read the floor texture pattern, dodge with the belt direction.
- Phase 2 second-swing eat. Dodging the first slash but forgetting the combo. Fix: dash twice — once to break line of sight, once to clear the linked second slash.
- Phase 3 wolf-stack. Letting the wolf-beast minion accumulate while focusing damage on the giant form. Fix: kite the wolf into the next fist-strike shadow.
- Phase 3 fist-strike landing. Reading the shadow as a slow marker rather than a one-beat lock-in. Fix: the shadow appears one beat before impact, not three; dash on shadow appearance.
Tier justification — why Lionel is S-tier
Lionel earns S-tier because the three phases each require a different mechanical discipline (story-gate clear + belt-direction reading + arena-scale dodge mapping) on a single life pool with no rest between phases. The composite-boss IA treatment means a death restarts at phase 1; players who clear phases 1 and 2 cleanly often spend 8+ attempts on phase 3 because the wolf-summon + projectile spread + fist-strike combinations evolve faster than the per-attack recovery windows allow for blind reads. The fight is the project's hardest sustained-DPS encounter; comparable in shape to Thorne r3's wolf-form but with one more phase preceding it.
Pro tips (all three fights)
- Orrery Warden is a sweep cadence test — commit to horizontal weapon swings even when no soul is in your immediate space.
- The Congealed rewards inside positioning. Push in on the sweep tell; punish on the slow limb recovery.
- Lionel phase 2 demands belt direction reading — the floor texture shifts visibly between cycles.
- Lionel phase 3 is a fist-strike rhythm fight. Bait the wolf-summons into the fist-strike landing zone for free clearance.
- No backtrack possible mid-fight. The Lionel arena is a mirror-world room with no Spark Generator beacon, no shrine, no retreat path. Loadout commits before phase 1 dialogue.
Speedrun notes
The fastest Lionel kills run the phase 1 dialogue at default speed (non-skippable beats), then commit 3-hit punishes on every conveyor-floor recovery in phase 2 and every fist-strike recovery in phase 3. A clean composite kill is around 12-14 minutes of fight time.
Lore notes
Lionel is the campaign's antagonist resolution. The Radiant Manor dining-room phase 1 dialogue ("You became her worshipper...") establishes the lord-and-lady framing that the post-credits Cappy epilogue ("They don't see it yet, but you've given them their best chance to survive") inverts. Lionel's three forms — fencer, conveyor lord, giant purple-hair beast — map onto the campaign's three escalating registers: human nobility, mechanical industry, eldritch threat.
The post-Lionel cinematic is documented end-to-end with verbatim dialogue + frame anchors on the final choice deep dive. The Yacht-Club fortress destruction intermission that follows the kill is a separate beat from the boss fight; it plays during the post-credits sequence regardless of which final choice the player picks (in the observed ending — other branch outcomes pending).
Frequently asked
Can I leave the Lionel arena between phases? No. The three phases run continuously on a single life pool. Loadout commits before phase 1.
Is Lionel missable? No. Lionel is the campaign-final boss; you cannot complete the main story without defeating phase 3.
Does the final-choice prompt fire before or after Lionel? After. The prompt fires at the conclusion of phase 3. See final choice deep dive.
Are The Congealed and Orrery Warden also gated to Astral Orrery? Yes. Both are mirror-world or pre-mirror-world fights inside the Astral Orrery region — neither appears in any other region.
Why is the Lionel page treated as one composite rather than three? Per the Scout addendum IA decision, same shape as Thorne — multi-phase bosses fragment SEO intent across three URLs if split. The composite page captures the "how to beat lionel" search intent in one place.
Best build for Lionel phase 3? Specific picks land with /trinkets/ and /weapons/ P3. The fight rewards range over damage-per-hit because the fist-strike recovery is the only reliable damage window and committing in melee during the wolf-summon stacks pressure too high.
What to do after these fights
The campaign ends. The endings deep dive picks up:
- All endings explained — long-form reading of every ending in the matrix.
- Final choice deep dive — the end-of-game branch unpacked.
- NG+ ending impact — second-run delta.
- Astral Orrery walkthrough for the region traversal + mirror-entry mechanic + Spark Generator tower climb (the third and final tower-climb region).
- Duke choice deep dive — the act-1 decision that seeds the ending tree shape Lionel resolves.
PATCH MAINTENANCE Tactics here verified against patch 1.0.0 on 2026-05-31. If a future patch tunes Lionel phase 3 fist-strike timing or the wolf-summon cadence we update this page within 24-72 hours and bump the patch line in the footer.