Septemburg's autumn farmland houses two boss fights — the Madd House (a giant haunted-farmhouse with two pink-glowing window-eyes) and the Carving Man (a Halloween-themed noble in the Carving Shack with pumpkin-spread projectiles). Both encounters lean on tight projectile lanes and predictable positional resets, but they reward very different playstyles: Madd House is a centre-lane hold, Carving Man is a column read.
The region runs two distinct boss windows in the source clip — Madd House at compilation t≈21:13-22:30, Carving Man at compilation t≈22:44-28:00.
FACT-CHECK ANCHOR
Region placement, boss roster and arena layout fact-checked against the Scout addendum + the in-clip boss banners and room nameplates. Attack patterns / counters authored from frame-by-frame review of the Kakuchopurei ALL BOSS FIGHTS compilation (boss banners "MADD HOUSE" and "THE CARVING MAN" visible at t=21:22 and t=23:50 respectively). Each attack's source_url anchors to the timestamp where the attack first appears.
Madd House — the haunted-farmhouse pressure boss
Madd House
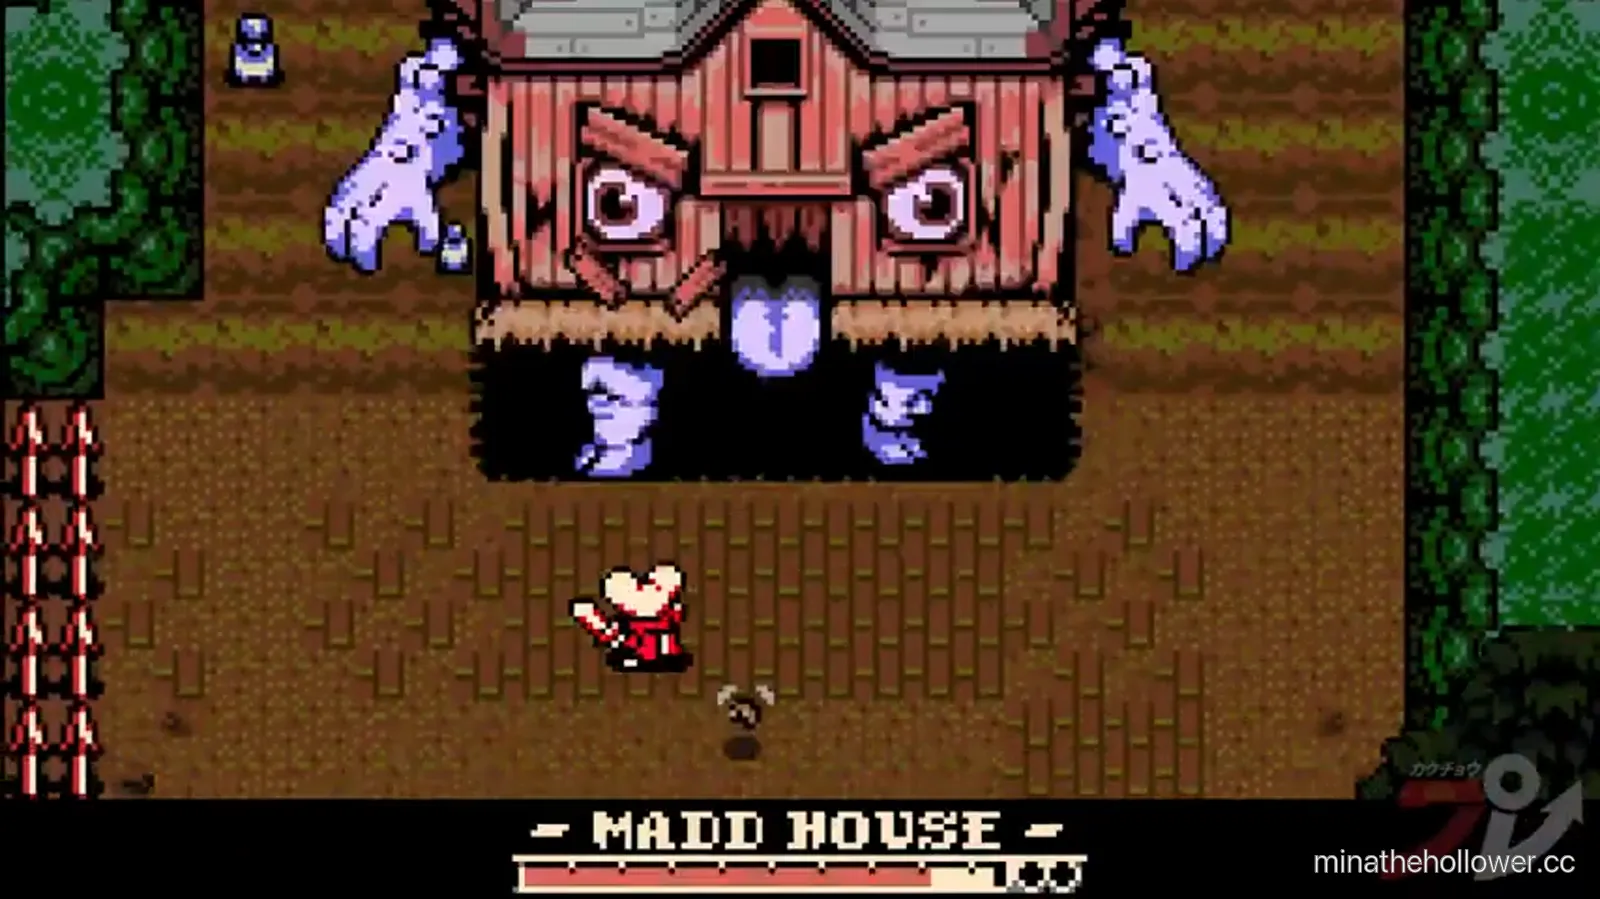
Frame from Kakuchopurei · clip @ 21:22
The arena, on first read
The Madd House sits at the far end of the autumn-farm approach, framed by the boss banner that drops in at t≈21:22. The boss itself is stationary — the entire arena is the front yard, the farmhouse body is the kill target, and everything except the centre lane is a threat origin. The house's flame-licked roof eaves on both sides are a non-textual telegraph that this is the boss trigger, separate from the ambient autumn farmland tiles.
Three attack lanes converge on the player:
- Two ghost-hand swipes from the left and right sides of the house body (independent timing — see attack 1).
- A pumpkin-bomb drop from the front-door slit-mouth (centre lane).
- A mosquito swarm that flies out from the chimney/roof area (overhead).
Attack 1 — Ghost-hand swipe (the asymmetry)
The fight's key read: the two ghost hands do not swipe simultaneously. The left hand fires first by a fraction of a beat, then the right. This staggered timing is the single most important piece of information in the fight — players who treat the swipes as a symmetric wall die to the second hand while still mid-dash from the first.
Staying in the centre lane between the two hand origins is the safest sustained position. You can dash into the gap the moment one hand starts wind-up, then react to the second swipe with a fresh dash budget. The two hands wind up visibly — they rise from the house's shoulders and flex briefly before each swipe.
Misread: corner-camping near either side wall. The wind-up of the adjacent hand becomes invisible at sharp angles, and the swipe arc covers more arena width than the hand sprite suggests. Fix: stay within one tile of the centre column.
Attack 2 — Pumpkin-bomb drop (the fuse window)
The mouth-slit beneath the two window-eyes distends downward and pumpkin-shaped bombs fall to the ground in front of the boss. The bombs are not damaging on the fall or on the landing — only when they explode. The fuse is roughly one beat after they land, which is enough time to dash through the gaps between AOE patches before they detonate.
Two bombs can be detonated for free by the boss's own ghost-hand swipe. Bait the swipe over a fresh drop and the swipe's hitbox triggers the bombs without putting Mina at risk. This is the cleanest crowd-control read in the fight.
Attack 3 — Mosquito swarm (the irritant)
The wasps die in one hit but their hitboxes are tighter than the ghost-hand swipes, so they slip through dodges aimed at the larger attacks. Bait the next ghost-hand swipe over a swarm to clear them for free. The swarm sound effect is subtle but distinct — a soft buzz that precedes the visual.
The swarm's projectile lanes are not fixed — the wasps home in on Mina's position at the moment they leave the chimney. Stand still during the swarm and they cluster; move during the swarm and they spread.
The clean rotation
Left swipe → dash through gap to centre → right swipe → dash through gap back → pumpkin-bomb drop (wait for fuse, dodge through gaps OR bait the next swipe over the bombs) → mosquito swarm (sweep with weapon or bait into next swipe) → committed weapon hits on the house body between cycles.
Common deaths
- Eating the second swipe. Players who dash through the first swipe stop dashing because they cleared the visible threat; the staggered second swipe lands a beat later. Fix: treat the swipes as a two-step sequence, not a single attack.
- Bomb-cluster suicide. Dodging into the bomb cluster during the fuse window — players who don't read the fuse timer assume the landed bombs are safe to step on. Fix: the fuse is one beat; treat the landed bombs as active obstacles, not floor.
- Mosquito chip-stack. Ignoring the wasps to commit damage on the house body. The wasps don't kill on their own but they steadily chip Mina across the fight; players who skip the sweeps end runs on the chip total. Fix: sweep the wasps every cycle.
Tier justification — why Madd House is B-tier
Madd House lands B-tier because the asymmetric ghost-hand swipe is the single hard read in the fight — everything else (the bombs, the wasps) is either predictable or low-pressure. Players who learn the swipe asymmetry on attempt 2-3 clear from then on; players who never read it die repeatedly to the same beat.
The Carving Man — Carving Shack projectile-and-lunge
The Carving Man
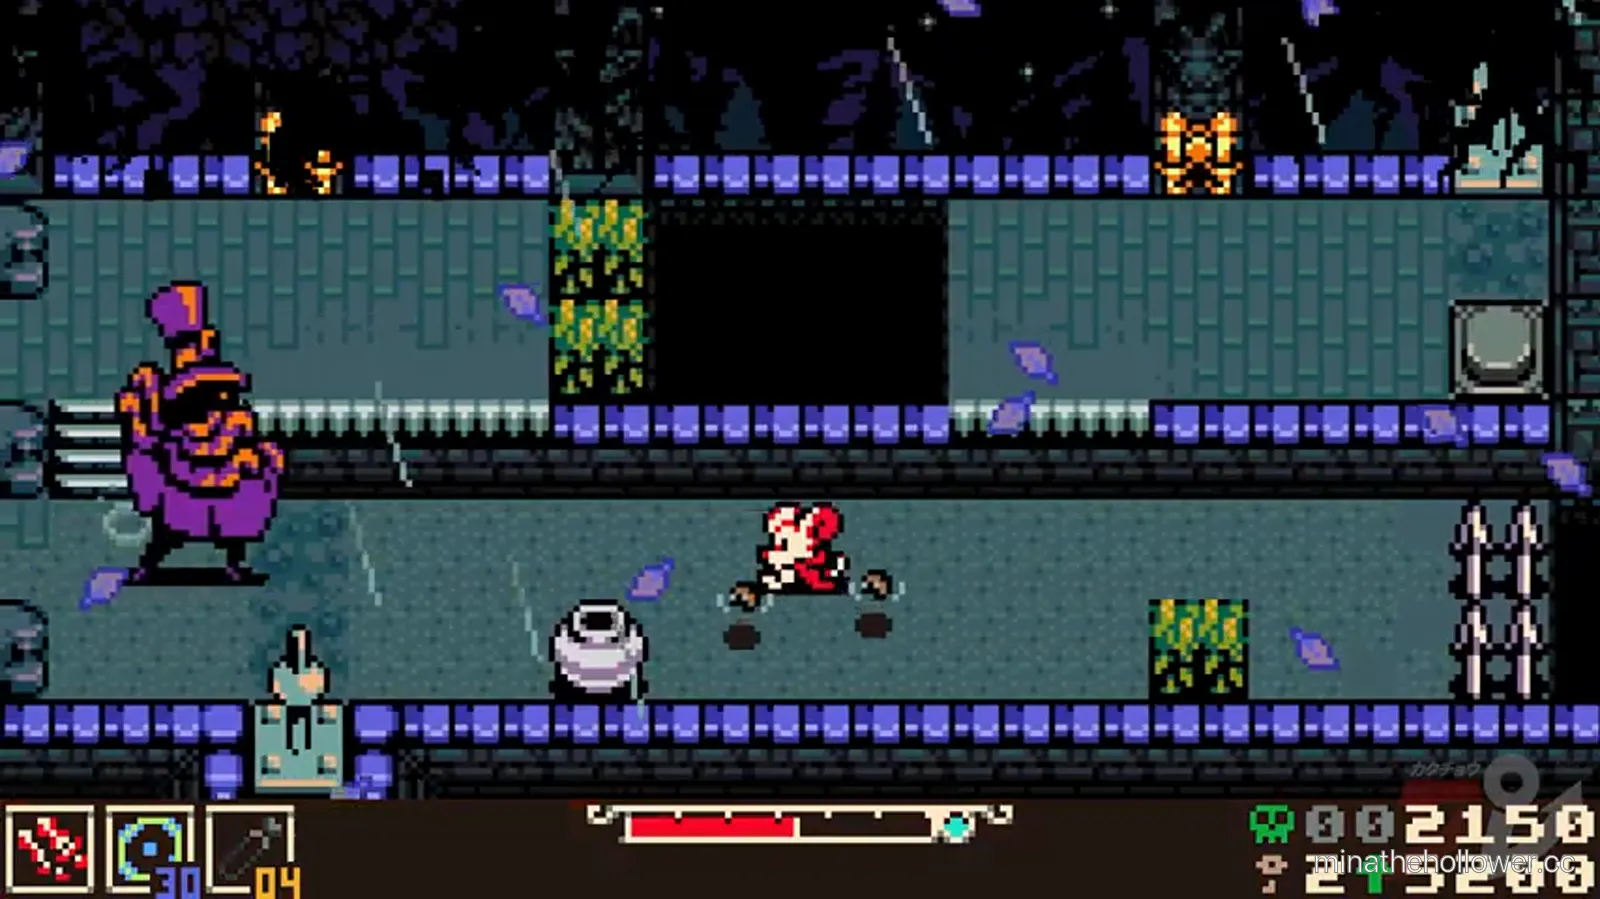
Frame from Kakuchopurei · clip @ 23:19
The arena, on first read
The Carving Shack is tighter than Madd House's open farmland. The arena is a column-blocked interior with physical pumpkin/log obstacles you can use to break line of sight on the projectile spread — but those same obstacles also constrain your dodge angles. The room nameplate "Carving Shack" is visible on entry; the boss banner "THE CARVING MAN" drops at t≈23:50.
The Carving Man's sprite reads as a Halloween-themed noble or conductor: tall hat, long blade-tool, purple cloak. The hat itself is a tell (see attack 3).
Attack 1 — Pumpkin projectile spread
His arms rise and orange pumpkin shapes form in both hands. The spread fires the moment his sprite peaks at the top of the wind-up. The lanes are fixed — find a column between two lanes and stay in it.
The lanes converge slightly toward the player rather than firing in perfect parallel — at close range the lanes overlap to a single tile, which is why melee-rushing during the wind-up dies. Dash diagonally during the wind-up if you start in a lane; the gap is consistent enough to read on first attempt.
Attack 2 — Carving lunge
A single-lane melee strike covering roughly three tile-widths. Faster than Hulk Trooper's shoulder charge but covers less ground. The sprite plants both feet and the carving tool flashes orange-pink for a beat before the lunge fires — the flash is the lock-in frame.
Side-dash perpendicular to the lunge line. The end-of-lunge stationary frame is a clean 2-hit punish slot. Greedy 3-hit punishes get caught by the next attack tell.
Attack 3 — Conductor stance reset
Between attacks he walks into a wide stance with his hat (the conductor-style top hat) tilted upright — a brief idle pose that gates his next attack tell. The pose is symmetric and the carving tool does not flash; this is the only non-damaging telegraph in the rotation.
Slam in 1-2 weapon hits during the stance. Do not stay in melee through a second attack tell — his next spread will catch a stationary player.
Common deaths
- Trading hits during the spread. Players who eat a single projectile to land a melee hit on the wind-up frame discover the spread is 3 projectiles, not 1. Fix: dodge the spread first, then commit damage on the recovery.
- Cornered against a Carving Shack obstacle. The interior columns block sight lines but also block dodge dashes. Players who use them for cover often pin themselves against the wall and eat the next spread. Fix: treat the columns as one-time-use cover, not positions.
- Greedy conductor punishes. Three weapon hits during the stance overlap with the next spread wind-up. Fix: two hits maximum.
Tier justification — why Carving Man is A-tier
The Carving Man sits one tier above Madd House because the tight arena + the projectile spread + the lunge create a single sequence that demands consistent column reads. Players who clear Madd House on attempt 2-3 often spend 4-6 attempts on Carving Man. The fight is the first main-path encounter where positional discipline (centre-lane hold) doesn't apply — the lanes shift every wind-up.
Pro tips (both fights)
- Bait the ghost-hand into the bombs. Madd House's swipe arc detonates landed bombs for free, which is the cleanest crowd clearance available.
- Use the Carving Shack columns as one-time cover. Break line of sight on the spread, then reposition out of the shadow before the next wind-up.
- The conductor stance is the only safe punish window in the Carving Man fight. Save weapon swings for that window; the lunge recovery is shorter than it looks and the next spread queues up fast.
- Septemburg's Tower is not a boss fight. Despite the visual similarity to a tower-climb sequence, the Tower interior is a long dungeon corridor — Septemburg is not one of the three tower-climb regions (those are Queensbury Crypt, Nox's Bayou, Astral Orrery).
Speedrun notes
The Madd House fight cycles fast if you only commit weapon hits during the mosquito swarm — the wasps die in one swing each and the swing itself lands on the house body. A clean 3-cycle Madd House kill is around 1:15. The Carving Man fight is slower; the lunge recovery is the only reliable damage window, so kills run 2:30-3:00.
SEPTEMBURG TOWER NOTE The Septemburg Tower climb is a mini-game / traversal segment, not a boss fight. It's covered on the Septemburg walkthrough page rather than here. Some of the source-clip frames around t=26:36 onward are tower-climb intermission shots, not Carving Man combat.
Lore notes
Both Septemburg bosses share an autumn-Halloween framing — pumpkin sprites, hay-bale fences, conductor hats, jack-o-lantern faces. The region's narrative beats establish Septemburg as the farmland counterpart to Queensbury Crypt's masonry interior; both regions cap on bosses themed around the local cosmetic palette (the Duchess in crypt-stone, the Carving Man and Madd House in autumn fields).
The Lionel foreshadow line ("Lionel is lying to you!") appears in the post-Carving-Man dialogue beat at compilation t=27:44. This is the first explicit reference in the source clip to the final-region boss chain. Players who skip post-boss dialogue miss this anchor.
Frequently asked
Which Septemburg boss should I fight first? Madd House triggers first in the region path — you don't choose the order. The Carving Man gate is past the Septemburg Tower interior, after the Madd House clear.
Are either boss missable? No. Both are required for the Spark Generator beacon activation.
Does the Carving Man drop a trinket? No — neither Septemburg boss drops a trinket. The Septemburg trinket pickups are in the region's collectible chests, not boss rewards. See the Septemburg walkthrough.
Can I skip the Tower? No. The Septemburg Tower interior gates the Carving Shack arena.
Why is Madd House sometimes called "the haunted farmhouse"? It's the same boss — the in-game banner says "MADD HOUSE" but the design is unmistakably a haunted-house archetype. Both names refer to the same encounter.
Best build for the Carving Man? Specific trinket / weapon picks land with the /trinkets/ and /weapons/ P3 pages. The fight rewards range over damage-per-hit because the lunge recovery is the only reliable damage window and the punish is positional.
What to do after these fights
- The autumn farmland's full walkthrough lives on Septemburg walkthrough — entry path + Tower interior route + collectibles.
- The other any-order Generator regions: Queensbury Crypt (Duchess + Duke), Nox's Bayou (Nox Beast), Bone Beach (Major Miner / Mined Mind).
- For the difficulty-tier arc: All bosses hub shows the S/A/B/C distribution across regions.
PATCH MAINTENANCE Tactics here verified against patch 1.0.0 on 2026-05-31. If a future patch tunes telegraph timings or spread lane spacing we update this page within 24-72 hours and bump the patch line in the footer.